How to Clean and Seal Coral Stone: Easy DIY Maintenance Tips

Cleaning and Preparing to Seal Coral Stone
Cleaning and preparing to seal coral stone for sealing is an essential step to ensure the best results and longevity of the surface. Before beginning the cleaning process, it’s important to gather the necessary supplies, which may include a broom or brush, mild detergent, water, a pressure washer (if available), and safety equipment such as gloves and goggles.
First, start by removing any loose debris or dirt from the coral stone surface. Use a broom or brush to sweep away leaves, twigs, and other loose particles. This initial step will make the subsequent cleaning more effective.
Next, it’s time to tackle any stains or stubborn dirt. For general cleaning, mix a mild detergent with water according to the manufacturer’s instructions. Apply the soapy solution to the surface of the coral stone using a sponge or soft-bristled brush. Gently scrub in circular motions to lift dirt and grime from the pores of the stone.
Suppose you notice specific stains on your coral stone patio, such as oil spills or rust marks from outdoor furniture. In that case, you might need specialized cleaners or stain removers designed for those particular substances. Consult with professionals or research suitable products to address these specific stains effectively.
After thorough cleaning, rinse off the soap residue using clean water. A garden hose can be used for this purpose, but if you have access to a pressure washer, it can provide a more thorough rinse, especially for larger areas like driveways or expansive patios. When using a pressure washer, be sure to adjust the settings appropriately to avoid damaging the coral stone surface.
Once rinsed, allow ample time for the coral stone surface to dry completely before proceeding with sealing. Damp surfaces can interfere with proper adhesion of the sealant and may affect its effectiveness.
With a clean and dry coral stone surface in front of us, let’s now explore various techniques for effectively removing dust and dirt from the stone.
Techniques for Dust and Dirt Removal
While regular sweeping or using a dry mop can help minimize dust build-up on coral stone surfaces, occasional deep cleaning is necessary to remove embedded dirt. Here are some techniques you can employ:
For fine particles of dust, dirt, or sand that may have settled into the pores of the coral stone, using a vacuum cleaner with a brush attachment can be an effective method. The brush attachment helps agitate the dirt, allowing the vacuum to suction it away without scratching the surface.
If certain areas have stubborn dirt or stains that are difficult to remove, you can create a mild cleaning solution by mixing water with a gentle detergent. Apply this solution to the affected areas and gently scrub using a soft-bristled brush. Rinse thoroughly with clean water afterward.
To give an example of how dust and dirt removal can impact the appearance of your coral stone pool coping, imagine you have neglected regular maintenance and notice deeply ingrained dirt in the crevices. Through proper cleaning techniques, you can restore its pristine condition, enhancing your overall pool area aesthetic.
Remember to always follow manufacturer instructions and test any cleaning solutions on a small inconspicuous area before applying them to the entire coral stone surface. This will help ensure compatibility and prevent any potential damage.
Now armed with knowledge about cleaning techniques to clean and seal coral stone and how to remove dust and dirt effectively, it’s time to explore the benefits of sealing this beautiful natural material.
Benefits of Sealing Coral Stone
To seal coral stone provides several benefits that can enhance its longevity and aesthetic appeal. Here are some key advantages of sealing coral stone:
- Protection against Stains: Coral stone is porous, which means it has small holes that can absorb liquids and particles, leading to stubborn stains. Sealing the stone creates a protective barrier that prevents stains from penetrating the surface. Whether it’s spills from food, drinks, or oil-based substances, a sealed coral stone surface will be easier to clean and maintain.
- Improved Durability: Coral stone can be vulnerable to weathering, erosion, and general wear and tear over time. By applying a sealant, you can strengthen the stone’s structural integrity and protect it from damage caused by exposure to elements like UV rays, rainwater, and freeze-thaw cycles. This helps prolong the lifespan of your coral stone surfaces.
- Moisture Resistance: Unsealed coral stone is prone to absorbing moisture, which can lead to issues such as efflorescence (white salt deposits on the surface) or even cracks due to freeze-thaw cycles. Sealing the stone creates a barrier that repels water and minimizes moisture absorption, reducing the risk of these problems and preserving the stone’s appearance.
- Enhanced Color and Beauty: Coral stone comes in a variety of natural colors with unique patterns and textures. One of the benefits of sealing it is that it can intensify these characteristics, enhancing the stone’s overall beauty. Sealants often include color-enhancing properties that bring out the vibrant hues of the coral stone.
- Easier Maintenance: Sealed coral stone surfaces are much easier to clean compared to unsealed ones. The protective layer created by the sealant makes it more resistant to dirt, grime, and algae growth. Regular maintenance becomes simpler as the sealed surface can be easily wiped clean using mild soap and water, keeping your coral stone looking pristine for longer.
By sealing coral stone, you are not only enhancing its appearance and durability but also protecting your investment. It can save you time, effort, and money in the long run by reducing the need for extensive maintenance or potential repairs.
Essential Tools to Seal Coral Stone
When it comes to cleaning and sealing coral stone, using the right tools and sealants is crucial to achieve optimal results. Here are some essential items you’ll need:
Tools:
- Soft-bristle brush or broom: Use a gentle brush or broom to remove loose dirt and debris from the surface before applying the sealant.
- Pressure washer: For deep cleaning, a pressure washer can be effective in removing stubborn stains and ingrained dirt from hard-to-reach areas. However, use it with caution to avoid damaging the stone.
- Bucket: You’ll need a bucket for mixing the sealant solution and diluting cleaners if necessary.
- Applicator: Depending on the type of sealant used, an applicator such as a brush or roller may be required for application.
- Clean cloths or towels: These are handy for wiping off excess sealant or cleaning solutions during the process.
Sealants:
- Penetrating sealer: This type of sealant is specifically formulated for porous materials like coral stone. It penetrates into the stone to create a protective barrier without altering its natural appearance. Look for sealants designed to resist stains, moisture, and UV damage.
- Color-enhancing sealer (optional): If you wish to enhance the color of your coral stone surfaces while still providing protection, consider a color-enhancing sealer. This type of sealer intensifies the natural hues of the stone, giving it a more vibrant and attractive look.
Choosing the right tools and sealants for sealing coral stone is like assembling the perfect recipe for your favorite dish. Each ingredient plays a crucial role in achieving the desired outcome – a beautifully sealed and protected surface that will stand the test of time.
Armed with the essential tools and sealants, you’re ready to embark on the journey of cleaning and sealing your coral stone.
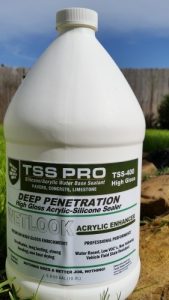
Choosing the Right Sealant
Selecting the appropriate sealant for your coral stone is crucial to ensure its long-term protection and maintenance. With various options available in the market, how do you choose the right sealant for you to seal coral stone?
The first step is to determine the type of coral stone you have. Is it a porous or non-porous variety? This will help you identify whether a water-based or solvent-based sealant is more suitable. Porous coral stone, which absorbs moisture easily, requires a sealant that provides deep penetration and high breathability.
Next, consider the environmental conditions your coral stone will be exposed to. If it is an outdoor installation subjected to harsh UV rays, rain, and other elemental factors, you’ll need a sealant with excellent UV resistance and weatherproofing properties.
Furthermore, assess if you want your coral stone’s natural color enhanced or prefer a matte or glossy finish. Some sealants are specifically designed to enhance the natural colors of stones like coral, while others provide a clear protective layer without altering the appearance significantly.
Seek recommendations from professionals or experienced individuals who have previously sealed their coral stone. Research reputable sealant brands known for their quality and durability.
Ultimately, always read product labels, check manufacturer instructions, and follow recommended guidelines for application to ensure optimal results. By choosing the right sealant tailored to your specific coral stone needs, you’ll protect its beauty and longevity.
Ask about our sealants today to discover which is best for your surfaces.
Process of Applying the Sealant to Coral Stone
Once you have chosen the appropriate sealant to seal coral stone, it’s time to start applying it. Following a systematic process ensures effective sealing and helps achieve the desired results.
Before beginning the application process, make sure that your coral stone is clean and free of any dirt or debris. Thoroughly sweep away loose particles using a broom or brush.
To enhance adhesion and absorption of the sealant, lightly dampen the surface of the coral stone. Ensure that it is evenly moist but not wet. This step helps the sealant penetrate deep into the stone pores for better protection.
Next, pour a small amount of sealant onto the coral stone surface. Start spreading the sealant using a foam brush or roller, working in one section at a time. Apply an even layer, making sure to cover all areas of the coral stone thoroughly.
As you apply the sealant, make sure to work it into any cracks or crevices in the stone to provide maximum protection against moisture penetration.
Allow the first coat to dry according to the manufacturer’s instructions. Typically, this may take a few hours or overnight.
After the initial coat has dried completely, apply a second coat following the same process. This second coat ensures an additional layer of protection and enhances durability.
Once both coats have dried completely, inspect the coral stone surface for any missed spots or uneven application. If necessary, touch up those areas with another round of sealing.
Imagine your beautiful coral stone patio glistening in the sunlight after successfully completing these steps and achieving a flawless seal!
Remember, proper ventilation during and after the sealing process is crucial. Allow ample time for complete curing before subjecting your coral stone to foot traffic or other environmental factors. And if you decide to have the professions help just reach out to Texas Stone Sealers!
Ensuring Proper pH Balance during Application
When it comes to cleaning and sealing coral stone, ensuring the proper pH balance during the application process is crucial for achieving optimal results. The pH level refers to the acidity or alkalinity of a substance, and it plays a significant role in determining the effectiveness of sealants.
Before applying any sealant on coral stone, it’s essential to clean the surface thoroughly. This involves removing any dirt, debris, or stains that may be present. Once the surface is clean, you can begin the sealing process.
The first step in achieving the proper pH balance is selecting a sealant specifically designed for coral stone. Different types of stone require different sealants, as they have varying chemical compositions and properties. It’s important to choose a sealant that is compatible with coral stone to ensure maximum effectiveness.
When applying the sealant, carefully follow the manufacturer’s instructions regarding mixing ratios and application techniques. Maintaining the proper pH balance often involves diluting the sealant with water or another specified solution. This helps ensure that the chemical reaction between the sealant and the stone occurs at an optimal level, allowing for better penetration and adhesion.
A common mistake made during application is using excessive amounts of sealant or failing to mix it properly. This can lead to an imbalance in pH levels, which may result in uneven coverage or poor bonding between the sealant and the stone surface.
To avoid this issue, apply the sealant evenly and in thin coats rather than trying to achieve full coverage in one application. This allows for better control over pH levels and ensures that each layer of the sealant bonds effectively with the coral stone surface.
In addition to proper application techniques, it’s important to consider environmental factors that can impact pH levels. For instance, high humidity or extreme temperatures can affect the curing process of certain sealants and alter their pH balance. It’s crucial to work within the recommended temperature and humidity ranges specified by the sealant manufacturer to achieve optimal results.
By ensuring a proper pH balance during the application of sealants on coral stone, you can enhance the effectiveness and longevity of the seal. This will help protect your coral stone surfaces from potential damage caused by moisture, stains, and other external elements.
Post Sealing Care of Coral Stone
Once you have successfully applied the sealant to your coral stone surfaces, it’s important to follow proper post-sealing care practices to maintain their appearance and longevity. Here are some essential tips for caring for your sealed coral stone:
- Regular Cleaning: Regularly clean your sealed coral stone surfaces using a mild detergent or stone-specific cleaner. Avoid harsh chemicals or abrasive cleaning tools that can damage the sealer or the surface of the stone.
- Prompt Spill Cleanup: Quickly clean up any spills on your sealed coral stone to prevent staining. Even though the sealant provides some resistance to stains, it’s still important to address spills promptly to minimize potential damage.
- Avoid Harsh Cleaning Methods: Refrain from using pressure washers or aggressive scrubbing techniques on your sealed coral stone as they can strip away the sealant and potentially harm the surface of the stone.
- Regular Inspection: Periodically inspect your sealed coral stone surfaces for any signs of wear or damage. If you notice any areas where the sealant has worn off or appears compromised, consider reapplying the sealant to ensure continued protection.
- Avoid Sharp Objects: Be cautious when placing sharp objects directly on your sealed coral stone surfaces, as they can scratch or chip the stone. Use coasters, trivets, or protective mats to prevent such damage.
- Reapply Sealant as Needed: Over time, the sealant on coral stone surfaces may wear off due to foot traffic, weather exposure, or regular use. Stay vigilant and reapply the sealant as necessary to maintain the protective barrier.
By following these post-sealing care practices, you can help preserve the beauty and integrity of your coral stone surfaces for years to come.
Effective Rinsing and Drying Methods
Properly rinsing and drying coral stone is a crucial part of its maintenance routine to ensure its longevity and preserve its natural beauty. When it comes to cleaning, the rinsing process plays a vital role in removing dirt, debris, and any existing cleaning agents from the surface of the coral stone. Here are some effective methods to rinse your coral stone:
- Water Hose or Pressure Washer: One of the simplest ways to rinse coral stone is by using a water hose or a pressure washer. Start by attaching a nozzle with a gentle spray setting to avoid damaging the stone surface. Gradually move the stream of water across the stone, paying close attention to areas with stubborn stains or dirt buildup. Make sure to rinse thoroughly, allowing the water to reach all crevices and joints between the stones.
Imagine you have a coral stone patio that has accumulated dirt and grime over time. By using a water hose or pressure washer, you can easily rinse off the surface contaminants and prepare it for further cleaning and sealing.
- Bucket and Sponge: For smaller areas or spot cleaning, using a bucket of clean water and a sponge can be effective. Dip your sponge into the water, wring out excess moisture, and gently wipe it across the coral stone surface. Ensure that you change the water in your bucket regularly to prevent the spread of dirt instead of removing it.
Once you have effectively rinsed your coral stone, proper drying methods are essential to prevent moisture-related issues that can lead to mold, mildew, or discoloration. Here are some useful techniques for drying coral stone:
- Air Drying: Allowing your coral stone to naturally air dry after rinsing is often the simplest approach. Ensure proper airflow by removing any obstacles that may block ventilation around the area. Depending on weather conditions and humidity levels, this method may take some time. However, it is a safe and effective way to dry your coral stone without causing any damage.
Consider this scenario: You’ve just finished rinsing off the coral stone around your swimming pool. By leaving it exposed to the air, you allow nature to do its job and gradually dry the surface, preserving the stone’s integrity.
- Absorbent Towels or Cloth: If you need to expedite the drying process, you can use absorbent towels or cloths to gently pat down the surface of the coral stone. Make sure the towels or cloths are clean to avoid transferring dirt onto the stone. Lightly press them against the surface without applying excessive force.
By following these effective rinsing and drying methods, you ensure that your coral stone remains clean, free from stains, and protected during the maintenance process.


